Table of Contents
Angular
A really cool tutorial: https://speakerdeck.com/toedter/cool-web-apps-with-spring-boot-angular-and-typescript
Tools
The tools for angular development.
| Tool | Input | Description |
|---|---|---|
| npm | package.json | Package manager. Resolves dependencies. \\Runs scripts. |
| webpack | webpack.config.js | Package CSS. Minify, uglify. |
Syntax
let
use let to declare variables.
Dont use var, it sometime doesnt respect the scope, like in for loops.
Typescript resolves the conflicts between scopes on its own, when using let
the code, when compiled
var let = 3;
 for (let i_1 = 0; i_1 < 10; i_1++) {
}
gives
var i = 3;
 for (var i_1 = 0; i_1 < 10; i_1++) {
}
primitives
// number
// defines a floating-point number, as well as hexadecimal, decimal, binary, and
octal literals.
age: number = 7;
height: number = 5.6;


// boolean
const isZeroGreaterThanOne: boolean = false;

//array
brand: string[] = ['Chevrolet', 'Ford', 'General
Motors'];

// any
// dynamic typing with any type
let distance: any;
distance = '1000km';
distances: any[] = ['1000km', 1000];

// custom types
type Animal = 'Cheetah' | 'Lion';
animal: Animal = 'Cheetah';
//Type '"Turtle"' is not assignable to type 'Animal'.
const animal: Animal = 'Turtle';


//Type inference
//Typing is optional since TypeScript is smart enough to infer the data types of variables
and function return values out of context
const brand = 'Chevrolet';
Enums
// enum
enum Brands { Chevrolet, Cadillac, Ford, Buick, Chrysler, Dodge };
myCar: Brands = Brands.Cadillac
// Inspecting the value of myCar returns 1 (which is the index held by Cadillac)

enum BrandsReduced { Tesla = 1, GMC, Jeep };
const myTruck: BrandsReduced = BrandsReduced.GMC;
//Inspecting myTruck yields 2, since the first enumerated value, Tesla, was set to 1
already.


// We can extend value assignation to all the enum members as long as such values are integers
enum StackingIndex {
    None = 0,
    Dropdown = 1000,
    Overlay = 2000,
    Modal = 3000
};
const mySelectBoxStacking: StackingIndex = StackingIndex.Dropdown;

enum Brands { Chevrolet, Cadillac, Ford, Buick, Chrysler, Dodge};
const myCarBrandName: string = Brands[1];


//from TypeScript 2.4 and onward, it is possible to assign
string values to enums.

enum StackingIndex {
    None = "eins",
    Dropdown = "zwei",
    Overlay = "drei"
};
// void
function test(): void {
    const a = 0;
}
ts
create a helloworld typescript app, save as hello.ts
let greet: string = "Greetings";
let geeks: string = "Geeks For Geeks";
console.log(greet + " from " + geeks);
// save the file as hello.ts
Install and transpile
npm install -g typescript

tsc hello.ts
run
node hello.js
run without binding to the host name
ng serve --port 8003 --host 0.0.0.0
run with polling
ng serve --poll 500
Watch changes in code and auto rebuild
ng build --watch --poll 500 --configuration development
To check if any module in a project is 'old': npm outdated.
To update all dependencies, if you are confident this is desirable: npm update.
To update all dependencies, if you are confident this is desirable: npm update xml2js.
To update package.json version numbers, append the –save flag: npm update –save.
ng build --watch --poll 500 --configuration development
add a dependency package to your project. E.g. `@angular/material`
ng add @angular/material
functions
function sayHello(name: string): string {
    return 'Hello, ' + name;
}

// bind to variable
const sayHello = function(name: string): string {
    return 'Hello, ' + name;
}

// this is how to mention the type of var with function
const sayHello: (name: string) => string = function(name:
string): string {
    return 'Hello, ' + name;
}

// optional parameters are marked with ?
function greetMe(name: string, greeting?: string): string {
    if(!greeting) {
        greeting = 'Hello';
    }
    return greeting + ', ' + name;
}
// Be aware that optional parameters should be placed last
// This creates a situation where both parameters would be considered mandatory.
function add(optional?: number, mandatory: string) {}


// Default parameters
function greetMe(name: string, greeting: string = 'Hello'):
string {
    return `${greeting}, ${name}`;
}

// One of the big advantages of the flexibility of JavaScript when defining functions is
// its ability to accept an unlimited non-declared array of parameters in the form of the
// arguments object. In a statically typed context such as TypeScript, this might not be
// possible, but it is actually using the rest parameter's object. We can define, at the end of
// the arguments list, an additional parameter prefixed by ellipsis ... and typed as an array:
function greetPeople(greeting: string, ...
names: string[]): string {
    return greeting + "," + names.join("and") + "!";
}


// lambdas alias "fat arrow functions" in angular
const double = x => x * 2;
double(5) // returns 10

let addAndDouble = (x, y) => {
    const sum = x + y;
    return sum * 2;
}
addAndDouble(1,2) // makes 3

// lambda without parameters
() => console.log("Hello " + this.name)


// lambdas are anonmous, they dont change value of "this"

// here a non anonymous function is used for logging
// but it changes the "this" to "greet = function()"
function delayedGreeting(name): void {
    this.name = name;
    this.greet = function(){
        setTimeout(function() {
            console.log("Hello " + this.name);
        }, 0);
    }
}
const greeting = new delayedGreeting("John");
greeting.greet(); // Hello "undefined"

// you can use the "ugly hack" with "that"
function delayedGreeting(name): void {
    this.name = name;
    this.greet = function(){
        const that = this; // <--- Ugly Hack!!!
        setTimeout(function() {
            console.log("Hello " + that.name);
        }, 0);
    }
}
const greeting = new delayedGreeting("John");
greeting.greet(); // Hello John


//instead you can use a lambda, as its anonymous and doesnt change scope of this
function delayedGreeting(name): void {
    this.name = name;
    this.greet = function() {
        setTimeout(() =>
            console.log("Hello " + this.name)
        , 0);
    }
}
const greeting = new delayedGreeting("John");
greeting.greet(); // Hello John
merge
Merge an item with an array
const newItem = 3;
const oldArray = [1, 2];
const newArray = [...oldArray, newItem];

const oldPerson = { name : 'John' };
const newPerson = { ...oldPerson, age : 20 };
template strings
const url =
`${baseUrl}/${path_to_
resource}?param=${parameter}¶m2={parameter2}`;
generics
// declare a generic argument arg
function method<T>(arg: T): T {
    return arg;
}

// express that the arg must be a number
method<number>(1);
// CustomPerson is also an array
class CustomPerson extends Array {}
class Person {}

// or an array of persons is an array
const people: Person[] = [];
const newPerson = new CustomPerson();

/ both is accepted in above "method"
method<Person>(people);
method<CustomPerson>(newPerson);
You can use “extends”
interface Shape {
    area(): number;
}
class Square implements Shape {
    area() { return 1; }
}
class Circle implements Shape {
    area() { return 2; }
}

// any amount of args which are an array of something, what extends "Shape"
function allAreas<T extends Shape>(...args: T[]): number {
    let total = 0;
    args.forEach (x => {
        total += x.area();
    });
    return total;
}

allAreas(new Square(), new Circle());
classes
- Property members in a class come first, and then a constructor and several methods and property accessors follow.
- None of them contain the reserved function word,
- and all the members and methods are annotated with a type, except constructor.
class Car {
    private distanceRun: number = 0;
    private color: string;

    constructor(private isHybrid: boolean, color: string =
    'red') {
        this.color = color;
    }
    getGasConsumption(): string {
        return this.isHybrid ? 'Very low' : 'Too high!';
    }

    drive(distance: number): void {
        this.distanceRun += distance;
    }

    static honk(): string {
        return 'HOOONK!';
    }
    get distance(): number {
        return this.distanceRun;
    }
}
- Members: Any instance of the Car class will contain three properties: color typed as a string, distanceRun typed as a number, and isHybrid as a boolean. Class members will only be accessible from within the class itself. If we instantiate this class, distanceRun, or any other member or method marked as private, it won't be publicly exposed as part of the object API.
- Constructor: The constructor executes right away when we create an instance of the class. Usually, we want to initialize the class members here, with the data provided in the constructor signature. We can also leverage the constructorsignature itself to declare class members, as we did with the isHybrid property. To do so, we need to prefix the constructor parameter with an access modifier such as private or public. As we saw when analyzing functions in the previous sections, we can define rest, optional, or default parameters, as depicted in the previous example with the color argument, which falls back to red when it is not explicitly defined.
- Methods: A method is a special kind of member that represents a function and, therefore, may return a typed value. It is a function that becomes part of the object API but can be private as well. In this case, they are used as helper functions within the internal scope of the class to achieve the functionalities required by other class members.
TypeScript eliminates this boilerplate of using “this.make=make” by using
accessors on the constructor parameters.
You can now type the following and TypeScript will create the respective public fields and make the assignment automatically.
class Car {
    constructor(public make: string, public model: string) {}
}
Interfaces
enforcing the existence of specific fields, as well as methods in classes .
interface Vehicle {
    make: string;
}

class Car implements Vehicle {
    make: string;
}
An interface may contain optional members as well.
The following is an example of defining an Exception interface that contains a required message and optional id property members:
interface Exception {
    message: string;
    id?: number;
}
One can instantiate anonymous interfaces. This is interesting because there are no classes involved. This means you can create a mocking library very easily.
interface A {
    a
}
const instance = <A> { a: 3 };
instance.a = 5;
mocking interfaces
interface DatabaseService {
    save(order: Order): void
}

...
new OrderProcessor(mockLibrary.mock<DatabaseService>());
Where in other languages we need to bring in a mock library as a dependency, in TypeScript, we can utilize a built-in construct by typing the following.
This creates an instance of DatabaseService. However, be aware that you are responsible for adding a process method to your instance because it starts as an empty object.
const databaseServiceInstance = <DatabaseService>{};
Decorators
Decorators - are declared annotations.
Decorators - can extend existing class / functions with new methods etc. They are breaking encapsulation of classes.
declare type ClassDecorator = <TFunction extends Function>(Target:TFunction) => TFunction | void;
For Classes
function Banana(target: Function): void {
    target.prototype.banana = function(): void {
        console.log('We have bananas!');
    }
}

@Banana
class FruitBasket {
    constructor() {}
}
const basket = new FruitBasket();
// basket.banana(); wont compile, as compiler enforced declaration of methods in FruitBasket. Cast to "any"
(basket as any).banana(); // avoid compiler error. Call Decorator method.
Decorators can receive arguments, like a string message
function Banana(message: string) {
    return function(target: Function) {
        target.prototype.banana = function(): void {
            console.log(message);
        }
    }
}
@Banana('Bananas are yellow!')
class FruitBasket {
    constructor() {}
}
As a rule of thumb, decorators that accept parameters
- require a function whose signature matches the parameters we want to configure (here Banana(String:message)
- and returns another function whose signature matches that of the decorator we want to define (here banana())
Method decorators
function Log(){
    return function(target, propertyKey: string, descriptor:
PropertyDescriptor) {
        const oldMethod = descriptor.value;
        descriptor.value = function newFunc( ...args:any[]){
            let result = oldMethod.apply(this, args);
            console.log(`${propertyKey} is called with ${args.
            join(',')} and result ${result}`);
            return result;
        }
    }
}
class Hero {
    @Log()
    attack(...args:[]) { return args.join(); }
}
const hero = new Hero();
hero.attack();
parameter of functions can be decorated
function Log(target: Function, key: string, parameterIndex:
number) {
    const functionLogged = key || target.prototype.constructor.
    name;
    console.log(`The parameter in position ${parameterIndex} at
    ${functionLogged} has been decorated`);
}
class Greeter {
    greeting: string;

    constructor (@Log phrase: string) {
        this.greeting = phrase;
    }
}
You have probably noticed the weird declaration of the functionLogged variable. This is because the value of the target parameter varies, depending on the function whose parameters are decorated. Therefore, it is different if we decorate a constructor parameter or a method parameter. The former returns a reference to the class prototype, while the latter returns a reference to the constructor function. The same applies to the key parameter, which is undefined when decorating the constructor parameters.
Parameter decorators do not modify the value of the parameters decorated or alter the behavior of the methods or constructors where these parameters live. Their purpose is usually to log or prepare the container object for implementing additional layers of abstraction or functionality through higher-level decorators, such as a method or class decorator.
Partial
interface Hero {
    name: string;
    power: number;
}
const hero: Partial<Hero> = {
    name: 'Iron man'
}
Union class
We've alrady learned about generics and how they help us when we want to mix types. A nice alternative, when we know what the possible types are, is the Union type.
interface Hero {
    name: string;
    powers: number[] | Record<string, number>;
}
Nulable
To indicate that a property is nullable
interface Hero {
    powers: number[] | null | undefined;
}
The {[key: string]: string} type in TypeScript.
The {[key: string]: string} syntax is an index signature in TypeScript and is used when we don't know all the names of a type's properties ahead of time, but we know the shape of the values.
//  function returning index signature
// (a key-value structure with key and value strings)
function getObj(): { [key: string]: string } {
  return { name: 'Bobby Hadz', country: 'Chile' };
}

// Interface using index signature
interface Person {
  [index: string]: string;
}

// const p1: Person
const p1: Person = { name: 'Bobby Hadz', country: 'Chile' };
Usage of Type Animal. Accepts properties with type “String” and value also “String”
// 👇️ Type using index signature
type Animal = {
  [index: string]: string;
};

const a1: Animal = { name: 'Alfred', type: 'dog' };
Here the compiler wont create a property with a value “number”.
interface Person {
  [index: string]: string;
}

// ⛔️ ERROR: Type 'number' is not assignable to type 'string'.
const p1: Person = { name: 'Bobby', age: 30 };
But you can fix it, by allowing string OR number.
interface Person {
  [index: string]: string | number;
  age: number;
  name: string;
}

// 👇️ const p1: Person
const p1: Person = { name: 'Bobby', country: 'Chile', age: 30 };
Readonly
You can also set an index signature to readonly if you need to prevent assignment to their indices.
interface ReadonlyObj {
  readonly [index: string]: any;
}

// 👇️ const p1: Person
const p1: ReadonlyObj = {
  name: 'Bobby Hadz',
};

// ⛔️ Error: Index signature in type 'ReadonlyObj'
//  only permits reading.
p1.name = 'James';
apply CSS classes
Single class
<p [class.star]="isLiked"></p>
Many classes
<p [class]="currentClasses"></p>

// object variable will be evaluated to star-class, as its true
currentClasses = {
  star: true,
  active: false
};
Event binding
An event binding listens for DOM events (It supports native DOM events that can be found at https://developer.mozilla.org/en-US/docs/Web/Events) that occur on the target HTML element and responds to those events by calling corresponding methods in the component.
The event inside parentheses is called the target event (click) and is the event that we are listening to.
The variable on the right is called the template statement and corresponds to a public method of the component. In this case, when the user clicks the button, the component calls the `onClick()` method.
// syntax
..(event)="template_statement"..

// example
<button (click)="onClick()">Click me</button>
 In the previous diagram, you can see an overview of how the component interacts with its
template bidirectionally.
In the previous diagram, you can see an overview of how the component interacts with its
template bidirectionally.
Input binding example
input binding is used when we want to pass data between components. This method is applicable in scenarios where we have two components, one that acts as the parent component and the other as the child.
—
A new component “alf-component1” :
app/alf-component1/alf-component1.component.spec.ts
import {Component, Input} from '@angular/core';

@Component({
  selector: 'app-alf-component1',
  templateUrl: './alf-component1.component.html',
  styleUrls: ['./alf-component1.component.css']
})
// export -  makes component public. So its selector becomes includable in other components
export class AlfComponent1Component {

  // allows to pass the "name" to the selector
  // as <app-alf-component1 [name]="hero"></app-alf-component1>
  @Input() public name: string;

}
Because a field “name” exists in component - I can use it in the template:
app/alf-component1/alf-component1.component.html
<p>alf-component1 and {{name}} works!</p>
— Default “root” component
app/app.component.ts
Define a “title” field.
@Component({
  selector: 'app-root',
  templateUrl: './app.component.html',
  styleUrls: ['./app.component.css', './app.component.custom.css', './app.component.gears.css', './app.component.icon.css', './app.component.icon.linkedin.css', './app.component.icon.blog.css']
})
export class AppComponent {
  title = 'Business Card';
}
Because the @Input was used on name- I can pass name as argument,
to the selector of component “alf-component1”,
when using the “alf-component” selector in another context.
And I bind the title field of root component to it.
app/app.component.spec.ts
<app-alf-component1 [name]="title"></app-alf-component1>
Output binding example
—
A new component “alf-component1” :
app/alf-component1/alf-component1.component.spec.ts
import {Component, Input} from '@angular/core';

@Component({
  selector: 'app-alf-component1',
  templateUrl: './alf-component1.component.html',
  styleUrls: ['./alf-component1.component.css']
})
// export -  makes component public. So its selector becomes includable in other components
export class AlfComponent1Component {

  // Output - allows to LISTEN for changes, when the selector of this component is used
  @Output() liked = new EventEmitter<boolean>();

}
Because a field “liked” exists in component - I can use to emit events:
app/alf-component1/alf-component1.component.html
<!-- Emitting the event only. The logic will be at the place, listening for the event.  -->
<button (click)="liked.emit(true)">Like</button>
Define a “onLike” method.
@Component({
  selector: 'app-root',
  templateUrl: './app.component.html',
  styleUrls: ['./app.component.css', './app.component.custom.css', './app.component.gears.css', './app.component.icon.css', './app.component.icon.linkedin.css', './app.component.icon.blog.css']
})
export class AppComponent {
  onLike($event:boolean){
    window.alert(`I like ${this.title}`)
  }
}
Because the @Output was used on liked- I can bind to events of liked,
when using the “alf-component” selector in another context.
And I bind the onLiked() method of root component to those events.
app/app.component.spec.ts
<app-alf-component1 (liked)="onLike($event:boolean)"></app-alf-component1>
Local references ( template reference variable )
In selectors of components - you can tag the component instance.
Then you will be able to access its properties directly. Syntax #TAGNAME
 <app-hero [name]="hero" #heroCmp (liked)="onLike()"></app-hero>

 <span>{{heroCmo.name}}
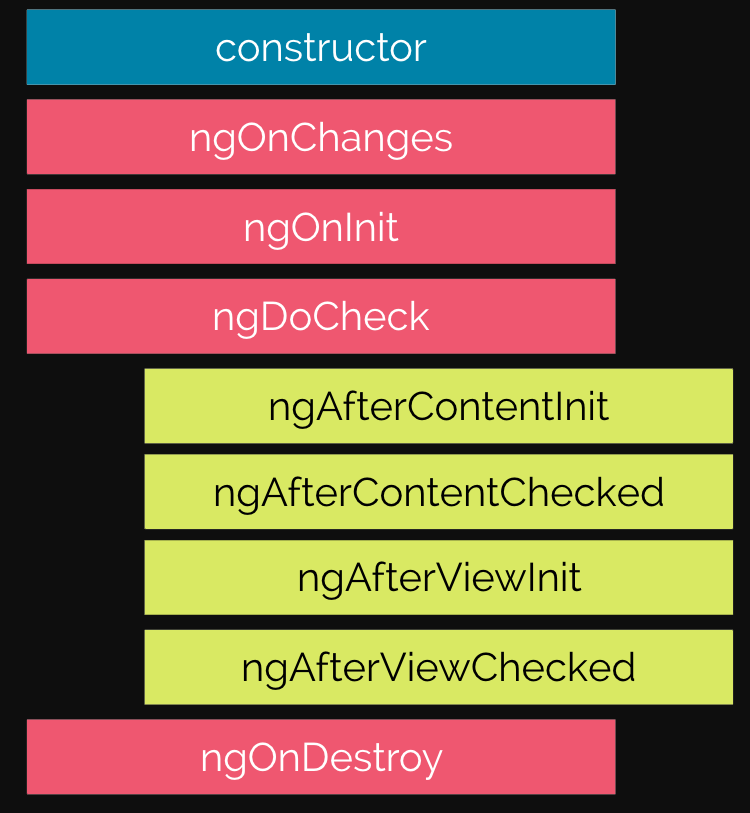
Lifecycle of a component
Lifecycle hooks are used, by implementing an interface.
export class HeroComponent implements OnDestroy, OnInit {
  @Input() name: string;
  @Output() liked = new EventEmitter();
  constructor() { }

  ngOnInit(): void {
  }

  ngOnDestroy() {
  }
}
Available intrefaces
- OnInit
- OnDestroy
- OnChanges
- DoCheck
- AfterContentInit
- AfterContentChecked
- AfterViewInit
- AfterViewChecked
Pipes and directives
- Components are directives with an associated template.
- Structural directives add or remove elements from the DOM.
- Attribute directives modify the appearance or define a custom behavior of a DOM element.
One can build custom directives.
Structural Directives
ngIf
If the expression evaluates to true, the element is inserted into the DOM. Or removed otherwise.
<p *ngIf="name === 'Boothstomper'">
{{name}} hero works!</p>


// this just HIDES the element but keeps it in DOM
<p [hidden]="name !== 'Boothstomper'">{{name}} hero works!</p>
It is recommended to use ngIf when dealing with a large amount of data
You can fall back to a default, when evaluated to “false”.
<p *ngIf="name === 'Boothstomper'; else noHero">
{{name}} hero works!
</p>

<ng-template #noHero>
  <p>Hero was not found</p>
</ng-template>
The noHero variable is a template reference variable. displayed on the screen only when the else statement becomes active.
ngFor
iterates through a list of items and binds each item to a template.
One can access properties of object like “hero”.
Additional properties are available:
- index indicates the index of the item in the array, starting at 0 (number).
- first/last indicates whether the current item is the first or last item of the
array (boolean).
- even/odd indicates whether the index of the item in the array is even or
odd (boolean).
<li *ngFor="let hero of heroes; property as variable"></li>
During the execution of ngFor, data may change, elements may be added or removed, and even the whole list may be replaced. Angular must take care of these changes by creating/removing elements to sync changes to the DOM tree.
ngSwitch
switches between templates within a specific set and displays each one depending on a condition.
<div [ngSwitch]="hero.team">
  <div *ngSwitchCase="'avengers'">{{hero.name}} is avenger</
  div>
  <div *ngSwitchCase="'villains'">{{hero.name}} is villain</
  div>
  <div *ngSwitchDefault>{{hero.name}}</div>
</div>
Custom directives
generate file
ng generate directive copyright
declare
@Directive({
  selector: '[appCopyright]'
})
apply
<p appCopyright></p>
Pipes
One can pass transformation functions via pipes.
<ul>
  <li *ngFor="let hero of heroes | sort:'name'">
    {{hero.name}}
  </li>
</ul>
One can create own pipes.
ng generate pipe sort
@HostBinding and @HostListener
- @HostBinding binds a value to the property of the native host element.
- @HostListener binds to an event of the native host element.
ng generate directive numeric
 import { Directive, HostBinding, HostListener } from '@angular/
core';
@Directive({
  selector: '[appNumeric]'
})
export class NumericDirective {

  @HostBinding('class')
  currentClass: string;

  @HostListener('keypress', ['$event'])
  onKeyPress(event: KeyboardEvent) {
	  const charCode = event.key.charCodeAt(0);
	  if (charCode > 31 && (charCode < 48 || charCode > 57)) {
		this.currentClass = 'invalid';
		event.preventDefault();
	  } else {
		this.currentClass = 'valid';
	  }
  }

  constructor() { }
}
Every time the user presses a key,
we extract it from the $event object,
convert it into a Unicode character using the charCodeAt method of the string prototype
and check it against non-numeric code.
If the character is non-numeric, we call the
“preventDefault” method of the $event object to cancel the user action and roll back
the input element to its previous state.
At the same time, we set the respective CSS class to
the input element, valid if the key is numeric, and invalid if it is not.
Apply
<input appNumeric></input>
dynamic view rendering
TemplateRef: The Angular generated ng-template element of the
embedded view.
ViewContainerRef: The container used to insert the embedded view, which is
adjacent to the host element
We can get an instance of each one by injecting them into the constructor of the directive:
constructor(private tmplRef: TemplateRef<any>, private vc:
ViewContainerRef) { }
Assume we pass to the component-template some roles
<div *appPermission="['admin', 'agent']"></div>
In the component, the viewContainer is then used to render views dynamically.
Depending on the appPermission content.
ngOnInit() {
  if (this.appPermission.indexOf(this.currentRole) === -1) {
    this.vc.clear();
  } else {
    this.vc.createEmbeddedView(this.tmplRef);
  }
}
Files
| .angular-cli.json | Angular CLI loads its configuration here. Technically, you’re not required to use Angular CLI to develop an Angular application, but its many features can highly improve the quality of your code and save you a lot of time along the way. |
| protractor.conf.js | Protractor configuration. Protractor is the end-to-end testing solution for angular apps. |
| karma.conf.js | Is the unit test configuration files. |
| package.json | Npm dependency packages that are identified in a package.json file. |
| tsconfig.json | The presence of a tsconfig.json file in a directory indicates that the directory is the root of a TypeScript project. |
| tslint.json | When using the CLI or many third-party tools, a file named tslint.json or tslint.yaml is used to configure which rules get run and each of their options. https://palantir.github.io/tslint/usage/configuration/ |
Glossary
Component and its Selector
Reusable piece of code, which can be embeded into HTML templates in form of HTML tags
Angular matches HTML tags with components via a selector. It is the name that you give to a component so that it is correctly identified in HTML:
<app-hello-world></app-hello-world>
<app-root></app-root>
...
The component stub can be generated.
Also under a “NGModule”, in a subfolder. Here component heroList under module and subfolder heroes.
ng generate component heroes/heroList --module=heroes
Decorator
Java like annotations. Metadata added to the class.
@Component({
  selector: 'app-hello-world',
  templateUrl: './hello-world.component.html',
  styleUrls: ['./hello-world.component.css']
  })
Templates
The HTML content of a component is called the template and is defined in the templateUrl property. It denotes the path of the HTML file of the component relative to the component class file:
See the reference to the template in the decorator above.
templateUrl: './app.component.html'
Template tags, mustache tags
Variables, defined in Components can be referenced in templates:
The {{ }} syntax is one example of the Angular template language, called interpolation.
It reads the name property of the component class,
converts its value to text,
and renders it on the screen.
constructor() {
 this.name = 'Felipe'; // set the name
}

<p>
 Hello {{ name }}
</p>


constructor() {
 this.names = ['Ari', 'Carlos', 'Felipe', 'Nate'];
}

<ul>
 <li *ngFor="let name of names">Hello {{ name }}</li>
</ul>
Property binding
The property inside square brackets is called the target property and is the property.
The variable on the right is called the template expression and corresponds to the public title property of the component.
// property binding
<span>{{ title }}</span>

// same as
<span [innerText]="title"></span>
Notice that we bind to the Document Object Model (DOM) property of an element, not an HTML attribute
Note:
When we open a web page in the browser, it parses the HTML content of the page and converts it into a tree structure, the DOM. Each HTML element of the page is converted to an object called a node, which represents part of the DOM. A node defines a set of properties and methods that represent the API of this object. innerText is such a property, which is used to set the text inside of an HTML element.
HTML attribute vs. DOM property
Attributes are defined by HTML. Properties are defined by the DOM (Document Object Model).
- A few HTML attributes have 1:1 mapping to properties. id is one example.
- Some HTML attributes don't have corresponding properties. colspan is one example.
- Some DOM properties don't have corresponding attributes. textContent is one example.
- Many HTML attributes appear to map to properties … but not in the way you might think!
Component Inputs
The component can receive inputs, when using the component's tag
@Component({
 selector: 'app-user-item',
 templateUrl: './user-item.component.html',
 styleUrls: ['./user-item.component.css']
 })
 export class UserItemComponent implements OnInit {
 @Input() name: string; // <-- added Input annotation
Usage
<ul>
 <li *ngFor="let name of names">
 <app-user-item [name]="name"></app-user-item>
 </li>
 </ul>
NGMOdule
You have to declare components in a NgModule before you can use them in your templates. You can think of an NgModule a bit like a “package” and declarations states what components are “owned by” this module.
@NgModule({
  declarations: [
    AppComponent,
    VideoItemComponent
  ],
  imports: [
    BrowserModule, HttpModule, RouterModule
  ],
  providers: [],
  bootstrap: [AppComponent]
})
export class AppModule { }
- declarations: The components, directives, and pipes that are registered with the module.
- imports: Other modules that contain declarations to be used by this module. The Angular CLI defines CommonModule automatically for us in this property. It is a module that is always used in Angular applications because it contains all the built-in directives and pipes that we usually would like to use. Be careful not to get caught in circular references when you import a module that already imports yours.
- exports: Angular artifacts that are defined in declarations and are available for other modules to use. This is the public API of the module. It defines what is publicly accessible or not. Everything else that's not explicitly exported would be considered private or internal to the module.
- providers: Services that are provided from the module and are accessible from any module of the application. We'll learn more about providers in the How dependency injection works in Angular section.
- bootstrap: The main component of the application that will be rendered when the application starts up. This property is set only once in the main application module, AppModule, and is usually AppComponent. Typically, you should not change it unless there is a particular reason to do so.
Providers
providers is used for dependency injection. So to make a service available to be injected throughout our application, we will add it here.
Interactions
when the button is clicked, it will call a function called addArticle(), which we need to define on the AppComponent class
<form class="ui large form segment">
 <h3 class="ui header">Add a Link</h3>

 <div class="field">
 <label for="title">Title:</label>
 <input name="title" #newtitle> <!-- changed -->
 </div>
 <div class="field">
 <label for="link">Link:</label>
 <input name="link" #newlink> <!-- changed -->
 </div>

 <!-- added this button -->
 <button (click)="addArticle(newtitle, newlink)"
 class="ui positive right floated button">
 Submit link
 </button>
</form>
The #newlink and #newtitle are used, to mark input variables for the addArticle() function.
Typings
JavaScript is untyped, meaning that we can pass around and use data, objects and functions with no constraints. We can write code that calls methods that don't exist on an object, or reference variables that we don't have. These kinds of mistakes can be hard to discover when you are writing code, and it can lead to unstable and buggy code. Doing big changes of your code can become difficult and risky as you don't immediately see if some changes conflicts with the rest of the code somewhere else.
TypeScript is mainly about adding types to JavaScript. That means that TypeScript requires you to accurately describe the format of your objects and your data. When you do that, that means that the compiler can investigate your code and discover errors. It can see that you are trying to call a function with the wrong kinds of arguments, or reference a variable that is not accessible in the current scope.
When you write TypeScript yourself, this formal description of the code is part of the code itself.
However, when you use external libraries like jQuery or moment.js, there are no information of the types in that code. So in order to use it with TypeScript, you also have to get files that describe the types of that code. These are the type declaration files, most often with the file extension name .d.ts. Fortunately people have written those kinds of type declaration files for most common javascript libraries out there.
Typings was just a tool to install those files. It is now best practice to just use npm.
When you have installed those files, which basically only means downloading them and placing them in your project, the TypeScript compiler will understand* that external code and you will be able to use those libraries. Otherwise you would only get errors everywhere.
https://stackoverflow.com/questions/41573822/what-are-typings-in-typescript
# Install Jquery typing
npm install --save @types/jquery
Bootstrapping in main.ts
How does Angular know, where to start?
What is responsible for booting up the process of rendering a page on the screen? This method is called bootstrapping, and it is defined in the main.ts file inside the src folder.
import { AppModule } from './app/app.module';


platformBrowserDynamic().bootstrapModule(AppModule)
  .catch(err => console.log(err));
Intelij IDEA
Plugin supports syntax highlighting https://www.sgalinski.de/typo3-produkte-webentwicklung/typoscript-phpstorm-webstorm-intellij/?utm_source=phpstorm&utm_medium=banner&utm_term=typoscript%20plugin&utm_campaign=phpstorm-typoscript
To have a support for the Idea, you should:
- node installed on the same machine as Idea, with aws-cli installed globally (npm install -g angular-cli)
- create the Angular project via Idea (File > New > Project > Static Web > Angular CLI) to avoid all kind of errors with work dir and not finding the “ng” executable
- add some arguments to the start script in package.json (“start”: “ng serve –port 5230 –host 0.0.0.0 –liveReload true –open true”)
- Run via Run > Run “Angular CLI Server”
Then the Browser should automagically pick up all changes, made in Idea
Packaging
Angular code pieces - can be packaged as a libs.
Both libraries and applications are modules a the end of the day. Their main difference is how they are built and deployed. A library can be packaged and published for easier reuse across projects. An application includes browser specific files for deploying and running in the browser.
In this article we will explore what happens when we build our library, package our library using npm pack. We'll also see how to actually use our library in a separate application. https://indepth.dev/the-angular-library-series-building-and-packaging/
IDE Intellij
Plugin supports syntax highlighting https://www.sgalinski.de/typo3-produkte-webentwicklung/typoscript-phpstorm-webstorm-intellij/?utm_source=phpstorm&utm_medium=banner&utm_term=typoscript%20plugin&utm_campaign=phpstorm-typoscript
To have a support for the Idea, you should:
have node installed on the same machine as Idea, with aws-cli installed globally
npm install -g angular-cli)
create the Angular project via Idea (File > New > Project > Static Web > Angular CLI) to avoid all kind of errors with work dir and not finding the “ng” executable
add some arguments to the start script in package.json
("startdev": "ng serve –port 5230 –host 0.0.0.0 –liveReload true –open true")
You can then add a Profile / Edit Configuration
Profile > npm
Command : run
Script : startdev
Arguments: -- --host 0.0.0.0 --liveReload true --open true
Run via Run > Run “startdev”
Then the Browser should automagically pick up all changes, made in Idea
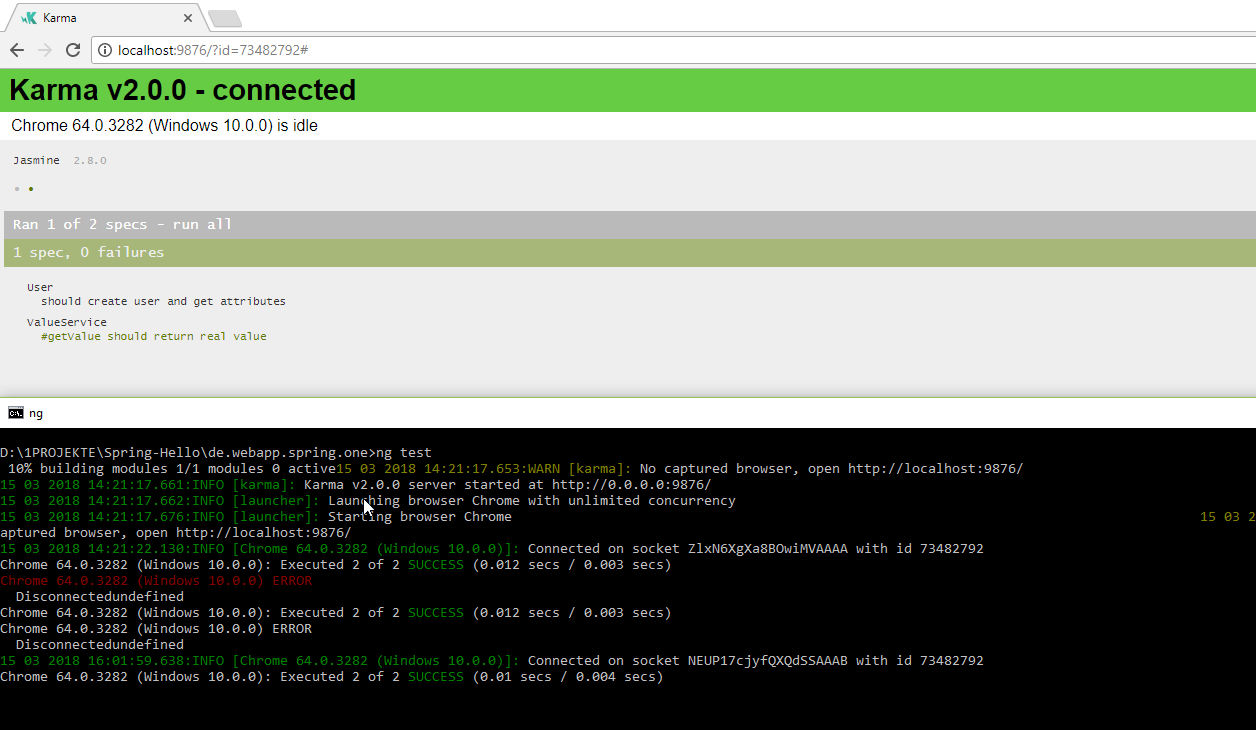
Unit tests
Unit-tests in Angular are using Jasmine.
Config file
| test.ts | This file is required by karma.conf.js and loads recursively all the .spec and framework files. It is referenced by .angular-cli.json. "test": "../../test/angular/test.ts", |
| tsconfig.spec.json | Describes where to look for the unit tets: "include": [
"../../../**/*.spec.ts",
"**/*.spec.ts",
...
|
The jasmine unit-tests are started via:
ng test
which opens a browser window with html results and a console. The coolest thing is, that they stay open and recompile every time, when something changes.
End to End tests
Protractor is an official library to used for writing E2E test suites with an Angular app.
It’s nothing but a wrapper over the Selenium WebDriverJS Api that translates its succinct code and methods to WebDriver JS methods. That said, you can use WebDriverJS methods too inside your e2e script.
Details: protractor
Typescript
Typescript intro in 5 minutes https://www.typescriptlang.org/docs/handbook/typescript-in-5-minutes.html
Primitive types: https://www.typescriptlang.org/docs/handbook/basic-types.html
| boolean |
| number |
| string |
| null |
| array |
| tupel |
| Enum |
| any |
| void |
| never |
| object |
Component Lifecycle
Async patterns
Promises
- They cannot be canceled.
- They are immediately executed.
- They are one-time operations only; there is no easy way to retry them.
- They respond with only one value.
private onComplete() {
  return new Promise((resolve, reject) => {
     setTimeout(() => {
     resolve();
    }, 2000);
  });
}


private setTitle = () => {
  this.title = 'Hello Angular 10';
}

constructor() {
  this.onComplete().then(this.setTitle);
}
Observers
// triggers every 2 sec his observables
title$ = new Observable(observer => {
  setInterval(() => {
    observer.next();
  }, 2000);
});


private setTitle = () => {
  const timestamp = new Date().getMilliseconds();
  this.title = `Hello Angular 10 (${timestamp})`;
}

constructor() {
  this.title$.subscribe(this.setTitle);
}